Table of Contents
TARDIS
The small cupboard at the back of the room is called the TARDIS.
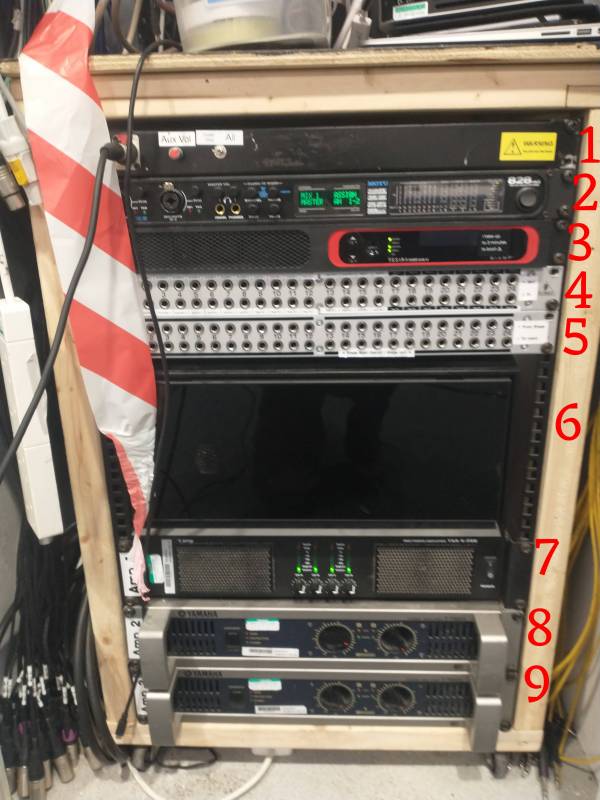
Sound Rack
 put a clearer (and more up to date) photo in here

This diagram shows the important cable connections in the back of the rack as of August 2023.  update for new layout and maybe embed instead of an attachment
sound_rack_08_2023.pdf
1 - Aux In
This input makes it easy to feed a stereo signal (e.g. from a phone or laptop) into the main speakers.
The knob allows you to adjust the volume of the sound.
The switch swaps this Aux from either being sent to all of the Amps or routing it to a subsection of the amps, designed for allowing you to play house music to the foyer while still preparing for the show in the annex.
All the things on this panel are connected to and processed by Tesira in the same rack.
2 - MOTU Audio Interface
 to be removed
This is an audio interface that may be used to get audio in and out of the sound PC but is currently not patched so requires manual patching from the back if you want to use it
This has 8 line inputs and 8 line outputs and a pair of mic inputs on the front
The MOTU can be connected to the Sound PC by USB.
3 - Tesira
The Tesiraforte AVB VI is used to provide speaker-specific EQs, feedback suppression and most importantly limiters.
Connecting it by USB to a computer enables use of it as an audio interface, currently setup with 8 channels of audio connected 1-1 with the outputs to the amps It can also be connected to the Mac Mini over ethernet to pass audio using AVB, same patching as USB
| Number | Input | Output |
|---|---|---|
| 1-4 | From patch panel 1A-1B | Amp 1A-1B |
| 5-6 | From patch panel 2A-2B | Amp 2A-2B |
| 7-8 | From patch panel 3A-3D | Amp 3A-3D |
| 9-10 | Aux | N/A |
| 11-12 | From patch panel Tesira inputs | N/A |
4 - Amps / Small store / Ties / other Patch
This Patch Bay connects outputs and ties to the small store patch panel, the Amps and miscellaneous ties around the annex. There are several different modes in use.
| Number | Out (A, top) | In (B, bottom) | Mode |
|---|---|---|---|
| 1-4 | Small store mics 1-4 | Small store mics 9-12 | Thru |
| 5-8 | Small store mics 5-8 | Small store ties 1-4 | Thru |
| 9-14 | Tie 1-6 (From desk) | Tie 1-6 (To stageboxes) | Normal |
| 15-16 | Booth 1-2 | Tesira inputs 11-12 | Thru |
| 17 | Return 1 | Amp 1A | Half Normal |
| 18 | Return 2 | Amp 1B | Half Normal |
| 19 | Return 3 | Amp 2A | Half Normal |
| 20 | Return 4 | Amp 2B | Half Normal |
| 21 | Return 5 | Amp 3A | Half Normal |
| 22 | Return 6 | Amp 3B | Half Normal |
| 23 | Return 7 | Amp 3C | Half Normal |
| 24 | Return 8 | Amp 3D | Half Normal |
Notes:
- Tesira inputs 11-12 are configured to be an auto mixing mic input and a phantom-powered input for a keyboard DI box.
- Return 1-8 are bundled in “The return loom”
- Amp outputs on the patch panel go through the Tesira before the amps, this prevents bypassing the limiter protection in the Tesira.
5 - Mic Line Patch Panel
This allows you to route the Mic lines from the stage left and right patch panels to specific input lines in the multicore loom to the desk.
This panel uses the normal mode (i.e. no patch cables means signals connect directly through from input to output)
6 - StageSoc Sound PC
 to be removed
7 - Amplifier 1
This is the main amplifier that drives the top speakers in the annex.
The inputs to the amps come from Tesira and the output speakon connectors go into the patch panel behind the rack and come out on the patch panels either side of the stage (or in the ceiling for the top speakers).
A-B = TOP R-TOP L
8 - Amplifier 2
This amplifier drives the subwoofer speakers in the annex
A-B = SUB L-SUB R
9 - Amplifier 3
This amplifier is used for all other speakers in the annex, eg. stage wedges, surround/effect speakers, green room, foyer.