Sidebar
wiki:annex:how_to_tardis
This is an old revision of the document!
Table of Contents
TARDIS
The small cupboard at the back of the room is called the TARDIS.
Sound Rack
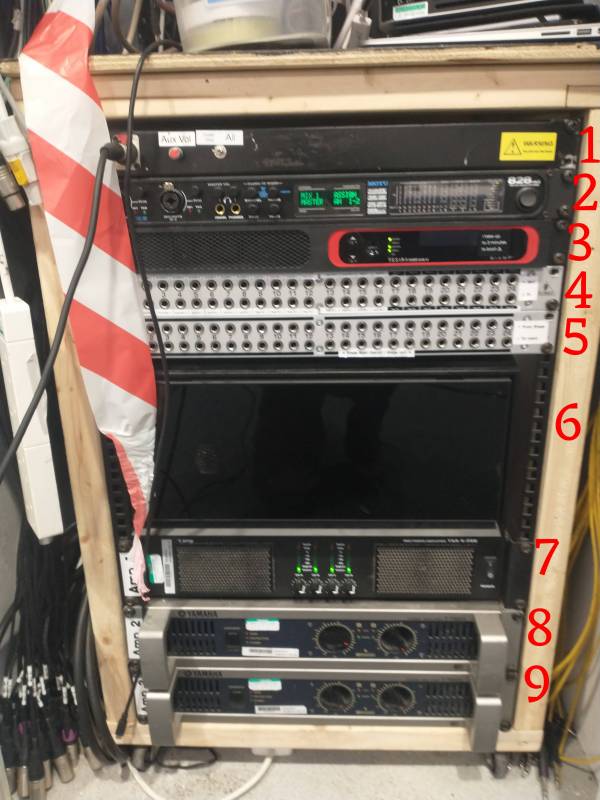
This diagram shows the important cable connections in the back of the rack as of December 2021. sound_rack.pdf
1 - Aux In
This input makes it easy to feed a stereo signal (e.g. from a phone or laptop) into the main speakers.
The knob allows you to adjust the volume of the sound.
The switch turns this input either mixing it to all of the PA or routing it too a single output.
All the things on this panel are connected to and processed by Soundweb in the same rack.
2 - MOTU Audio Interface
This is an audio interface that may be used to get audio in and out of the sound PC but is currently not patched so requires manual patching from the back if you want to use it
This has 8 line input and 8 line outputs and a pair of mic inputs on the front
The MOTU can be connected to the Sound PC by USB.
3 - Tesira
Tesiraforte AVB VI used to provide speaker-specific EQs, feedback suppression and most importantly limiters.
Connecting it by USB to a computer via USB enables use of it as an audio interface, currently setup with 8 channels of audio connected 1-1 with the outputs to the amps
| Number | Input | Output |
|---|---|---|
| 1-4 | From patch panel A1-A4 | Amp A1-A4 |
| 5-6 | From patch panel B1-B2 | Amp B1-B2 |
| 7-8 | From patch panel C1-C2 | Amp C1-C2 |
| 9-10 | Aux | N/A |
| 11-12 | Unused | N/A |
4 - Amps / Small store / Ties / other Patch
This Patch Bay connects outputs and ties to the small store patch panel, the Amps and miscellaneous ties around the annex. There are several different modes in use.
| Out (A, top) | In (B, bottom) | Mode |
|---|---|---|
| Small store mics 1-4 | Small store mics 9-12 | Thru |
| Small store mics 5-8 | Small store ties 1-4 | Thru |
| Tie 1-6 (From desk) | Tie 1-6 (To stageboxes) | Normal |
| Return 1 | Amp A1 | Half Normal |
| Return 2 | Amp A2 | Half Normal |
| Return 3 | Amp A3 | Half Normal |
| Return 4 | Amp A4 | Half Normal |
| Return 5 | Amp B1 | Half Normal |
| Return 6 | Amp B2 | Half Normal |
| Return 7 | Amp C1 | Half Normal |
| Return 8 | Amp C2 | Half Normal |
Notes:
- Return 1-8 are loomed with network cables, not to be confused with tie 1-6.
- Amps go through Tesira after this patch panel and before the amps.
5 - Mic Line Patch Panel
This allows you to route the Mic lines from the stage left and right patch panels to specific input lines in the multicore loom to the desk.
This panel uses the normal mode
6 - StageSoc Sound PC
7 - Amplifier A
This is the main amplifier that drives the main speakers in the annex.
The inputs to this amp come from Tesira and the output speakon connectors go into the patch panel behind the rack and come out on either side of the stage.
1-2 are for the tops (TOP R and TOP L) 3-4 are for the subs(SUB R and SUB L)
8 - Amplifier B
MonL/MonR
9 - Amplifier C
Foyer, etc.
wiki/annex/how_to_tardis.1692333754.txt.gz · Last modified: 2023/08/18 05:42 by Simon_Ruddock
Except where otherwise noted, content on this wiki is licensed under the following license: CC Attribution-Noncommercial-Share Alike 4.0 International
